Friday 26 March 2010

That Dresser........

Remember I talked about the dresser I had always wanted? Well, phase 1 is now sitting in my living room! Yes, a trip to the charity shop again (I practically live there) and lo and behold what did I find but this .......


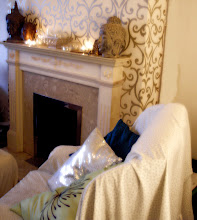
It had my name stamped all over it and kept calling to me to purchase it. I have to admit, it took some convincing my husband that yes it would sit perfectly the other side of the fireplace and I would shabby it along quite beautifully thank you, so within hours it was ours. Now hold onto your hats, this is what I paid for it...... a mere £50!! (plus £5 for delivery.) I'm crowing with sheer pleasure as I gaze upon it these few days past. But that's as far as I have come, simply looking at it, placing one or two objects on it, stepping back, allowing it to catch my eye as I enter the room (which still makes me grin.), and just plain look at it. You see, I am waiting for it to speak to me. I know I want to paint it but I don't know what colour yet and it hasn't told me either. I'm actually toying with a very pale peachy pink or a pinky cream or even a very pale duck egg blue. It will be 'distressed' eventually too and all the handles will be replaced but in the meantime it sits there grinning at me as I grin back at it. This has really been a cool month!


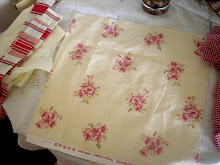
And now for something I totally screwed up! I bought 3 odd matching chairs for about £3 each, again from a charity shop and they all looked the same shape but of course were all the wrong colour wood so I decided to use some spare fabric I had to hand. True to form, I did no forward planning and didn't think about matching the design repeat.. in this case a large check. Spot the deliberate mistake......


You can see clearly where I didn't match up the material. I only had enough to make two chairs and the last chair will be covered with a plain cream.

I measured from the floor (allowing for hem), up behind the back of the chair over and down and across the seat, adding a seam allowance. This made one long piece and the two side panels were measured from the seat again to the floor. Using an old white sheet I cut out the pieces needed and pinned everything together, fitting each pinned piece over the chair and making necessary adjustments. As the chairs each have a flowered fabric cushion on the seat it isn't that obvious to tell that the slip covers were badly matched. My mother would notice and I know it, and you know now! Ho hum! The point is when I can next afford another chair to make a complete set of four I shall save again for fabric to cover them all. This time I shall allow for pattern repeats! Lesson learned :)


Thursday 25 March 2010

I thought I'd post some of my photographs. Of course they had to be B&W!!


One fing and anuvver


Oooohhh, I checked out some other bloggers. They do have some pretty pretty layouts and blogs. Well I'm new to this, I have tons of my own photos too so I'll be working on this blog as and when I get the time.

So many projects on the go and much to blog about..... hmmm where to start? Let's start with food as it's one of my favourite subjects!

I found a recipe for beer bread and I'm such a convert I make a loaf at least once a week. It's so simple and so delicious but I must add here that it is much better as toast or used as an open sandwich or as a huge slice with lashings of spread/butter and home made soup. (We just had same for lunch!) Here we go:

Ingredients/method/and all the other bits:

5+ 1/3 cup of SR flour. The original recipe said not to use bread flour but I do, in fact I use half and half. I use Allinson seed and grain bread flour and white SR and add 2 teaspoons of baking powder. Add to this 18 fluid ounces beer and half teaspoon salt. Mix all ingredients. Pour/dollop into a pre-greased large loaf tin and spread. Smooth out the top. Bake in the oven gas mark 4, for 50 - 55 mins. That's it, it's that easy! 45 to 50 mins into the baking I take it out, brush beaten egg over the top and sprinkle pumpkin seeds and/or poppy seeds and/or sunflower seeds and pop it back in for the last 5 mins. As to the beer, I've tried it with a light Belgian lager, a french lager and Newcastle brown. I must admit the best was the french lager! Next time I am thinking of adding caramelised onions, garlic, olives and walnuts to the mixture. Mmmmmmmmmm very artisan!
Here's the one we ate for lunch this afternoon.


I have a dark blue carpet inherited with the house I'm afraid so there wasn't an awful lot I could do about it except and until I thought about making my own rag rugs! I looked through YouTube and came across an American sculptress and archaeologist who posted instructions on how to make ones own hand loom for weaving rugs, just as the indigenous peoples of North America used to and, I have no doubt, my very own English and Irtish ancestors once did too. Of course when my husband arrived home for lunch, I immediately bounced him out of the door to the local DIY store (I love that place. It's a family run business, mother, son and grandson are all behind the counter and there isn't anything that they don't know about DIY which is a godsend to me and my SO to be truthful.) and we bought four lots of wood to make the frame, plus 2 pieces of dowelling and 'L' bracket metal joiner thinggys, (LOL, I don't know what their official title is!! I'll post images soon when we put it all together) Needless to say I'm so excited about this and cannot wait to get started. My husband is thrilled to think that at long last the attic which is practically full of all my unused or discarded scraps and rolls of materials and clothes (and that will now find a new lease of life as rugs), will be emptied of same. Of course we shall soon be falling over rugs and there will be sack loads of ready ripped rags and finished rugs in the attic instead!! Watch this space.....


I have to share these flowers with you. They were looking very limp and forlorn at the supermarket in the bargain bucket and they were simply crying out to be brought home. I already had that florists powder one adds to the water so mixed that up and they soon perked up. I adore the colours. It wasn't until I had placed them in the glass vase on the table in the living room that I remembered I had a galvanised steel jug somewhere waiting to be painted and shabby chic'ed and cottage eclectic'ed to within and inch of it's life. Next stop the big DIY superstore B&Q to find some paint for it. I wonder, can I paint it with acrylics? (I am a wannabe artist, I should know these things shouldn't I? LOL)

Wednesday 24 March 2010

Saying it with hearts and boxed pleats.

It's been a while and Valentines day has come and gone and yesterday my daffodils opened in the tub in the front garden. It must be spring!!
Speaking of Valentine's Day, I shan't bore you with the history of same but I have posted some

images of some handmade hearts I made. I even gave one to my sweetheart. As per usual I throw away very little and so I was able to use the filling of an old cheap cushion to fill the hearts. The inspiration was a comment overheard about someone sending a flight of kisses to a partner, hence the wings. I did make a pattern for these and I have kept them for future reference which is very unusual for me.


This month, March, saw me actually complete a project begun the same week, namely a removable cover for the footstool sitting in front of my husband's chair. Once again I surprised myself by measuring everything, the seperate cushion, the sides of the footstool, the width and depth and drop, etc etc. and marked the measurements out on the underside of the fabric in pencil before cutting. I had decided on the national flag theme having seen a few examples on some sites and like those examples decided not to stick to the traditional colour scheme but went with what I had at hand.


These colours of course are to be found within the curtains and armchair throw. You'll see that I made the top cushion a little too large, but it still works for all that. I re-discovered how to do box pleats and yes, found the very instructions when I googled for them LOL. Here's a link for inverted box pleats : http://www.burdastyle.com/techniques/make-box-and-inverted-box-pleats In retrospect I think it would have been better to have gone with the 'reverted' pleat, I think it would have looked better on the footstool. I thought box pleating on four corners would be amazingly complicated, having to sew on a curved corner, but I pinned and tacked at each stage before finally sewing in place and of course when the whole footstool skirt was finished I steam pressed the pleats and they looked ok.


Naturally it is worth noting that the original footstool was purchased at a charity shop for as little as £4 a year or more ago. The original fabric covering it was truly awful and I had removed that long before and just thrown a spare square of fabric over it. It was certainly in need of refurbishment LOL Anyway, the overall effect was how I wanted it so I am really pleased.

N.B Please bear with me as I familiarise myself with this 'editing' and 'layout' malarky. Things are not as uncomplicated as the appear on here and I am sure with a little more experience the final layout on my blog pages will look a little more professional :)